Content Editor
Before we dive into the doughy goodness that is sourdough ciabatta, let’s talk about what you can enjoy it with. This bread is incredibly versatile. Picture this: a hearty slice of ciabatta, slathered with creamy butter or dipped into a fragrant olive oil infused with herbs.
You could pair it with a fresh tomato salad, a bowl of rich soup, or even stack it high with your favorite deli meats and cheeses for a delicious sandwich. The possibilities are endless.

Introduction: Why This Recipe is Worth Your Time
Now, let me share why this simple sourdough ciabatta bread recipe will become a staple in your kitchen. I’ve been on this bread-making journey for quite some time.
I thrive on the magic of sourdough — the way it transforms simple ingredients into something special. What I love most is how the process is rewarding and a bit of an art form.
This ciabatta is not just a loaf; it’s a story waiting to be told with every slice. When I prepare it, I feel a satisfying connection to the kitchens of Italy, where ciabatta originated.
And the best part? You don’t need to be an expert baker to achieve that perfect crust and chewy interior.
With this recipe, I’ve used a unique combination of ingredients that brings out the best flavors in each loaf.
From the high-gluten bread flour that gives structure to the loaf, to the active sourdough culture that adds depth, it all works in harmony to create something truly delightful.
My Experience with the Ingredients
Let’s talk about the components of this ciabatta and why I chose them. High-gluten bread flour is my go-to because it provides the gluten structure essential for a chewy, airy texture.
The sourdough culture, which I nurture and cherish, introduces distinctive flavors and aromas. Using lukewarm water is crucial; it activates the yeast without shocking it.
Sea salt enhances the bread’s flavor while also controlling the fermentation process. Olive oil adds a silky mouthfeel, and honey seems like a surprising ingredient, but it really helps to balance the flavors and aids in browning the crust. Just imagine how much tastier your slice will be!
You’ll Also Like The Following Recipe
Ingredients List
- 3 ½ cups high-gluten bread flour
- ½ cup of active sourdough culture
- 1 ½ cups lukewarm water
- 2 teaspoons sea salt
- 1 tablespoon olive oil
- 1 tablespoon honey

How to Make Simple Sourdough Ciabatta Bread
Time to roll up those sleeves. Let’s get into the nitty-gritty of making ciabatta, step by step. Each step is designed to guide you smoothly through the baking experience.
Step 1: Mix the Dough
In a large mixing bowl, combine the active sourdough culture and lukewarm water. Stir until the culture is fully dissolved in the water. Next, add the honey and olive oil. This mixture should feel warm and welcoming between your fingers.
Now, sprinkle the high-gluten bread flour over the liquid mixture. Use a wooden spoon or your hands to gently mix everything until no dry flour remains.
You should feel a sticky and somewhat shaggy dough forming. Don’t worry if it feels like a mess; this is perfectly normal.
Step 2: Autolyse
Cover the bowl with a clean kitchen towel and let it rest for about 30 minutes. This is called the autolyse phase.
During this time, the flour absorbs the water, and enzymes start breaking down the starches. For me, this waiting time is a moment to reflect — yes, I really did that mix!
Step 3: Add Salt and Knead
Now, sprinkle the sea salt over the dough. With wet hands, fold the dough over itself a few times to incorporate the salt. It’s a bit like giving your dough a gentle massage – never fret about getting a little sticky!
After the salt is mixed in, you’ll want to knead. I prefer to knead right in the bowl. Grab a section of dough, stretch it upward, and fold it over itself. Repeat this for about 6-8 minutes, or until the dough becomes smooth and elastic.
Step 4: Bulk Fermentation
Transfer the kneaded dough to a lightly oiled bowl. Cover it with plastic wrap or a damp kitchen towel and set it aside in a warm place for about 4 to 6 hours.
This is the bulk fermentation stage. During this time, the dough will rise and develop flavor.
Every hour, I give it a gentle stretch and fold — this helps to build the gluten structure. I find it so satisfying to watch it transform. The dough will swell like a happy balloon!
Step 5: Shape the Dough
After your dough has risen significantly, pour it onto a well-floured work surface. This part is critical: be gentle! Use a bench scraper to divide the dough into two equal pieces.
Gently shape each piece into a rectangular shape without deflating too much air. Flour your hands so the dough doesn’t stick to you like glue. Transfer the shaped pieces onto a well-floured baking sheet. Let them rest for 30 to 45 minutes.
Step 6: Preheat the Oven
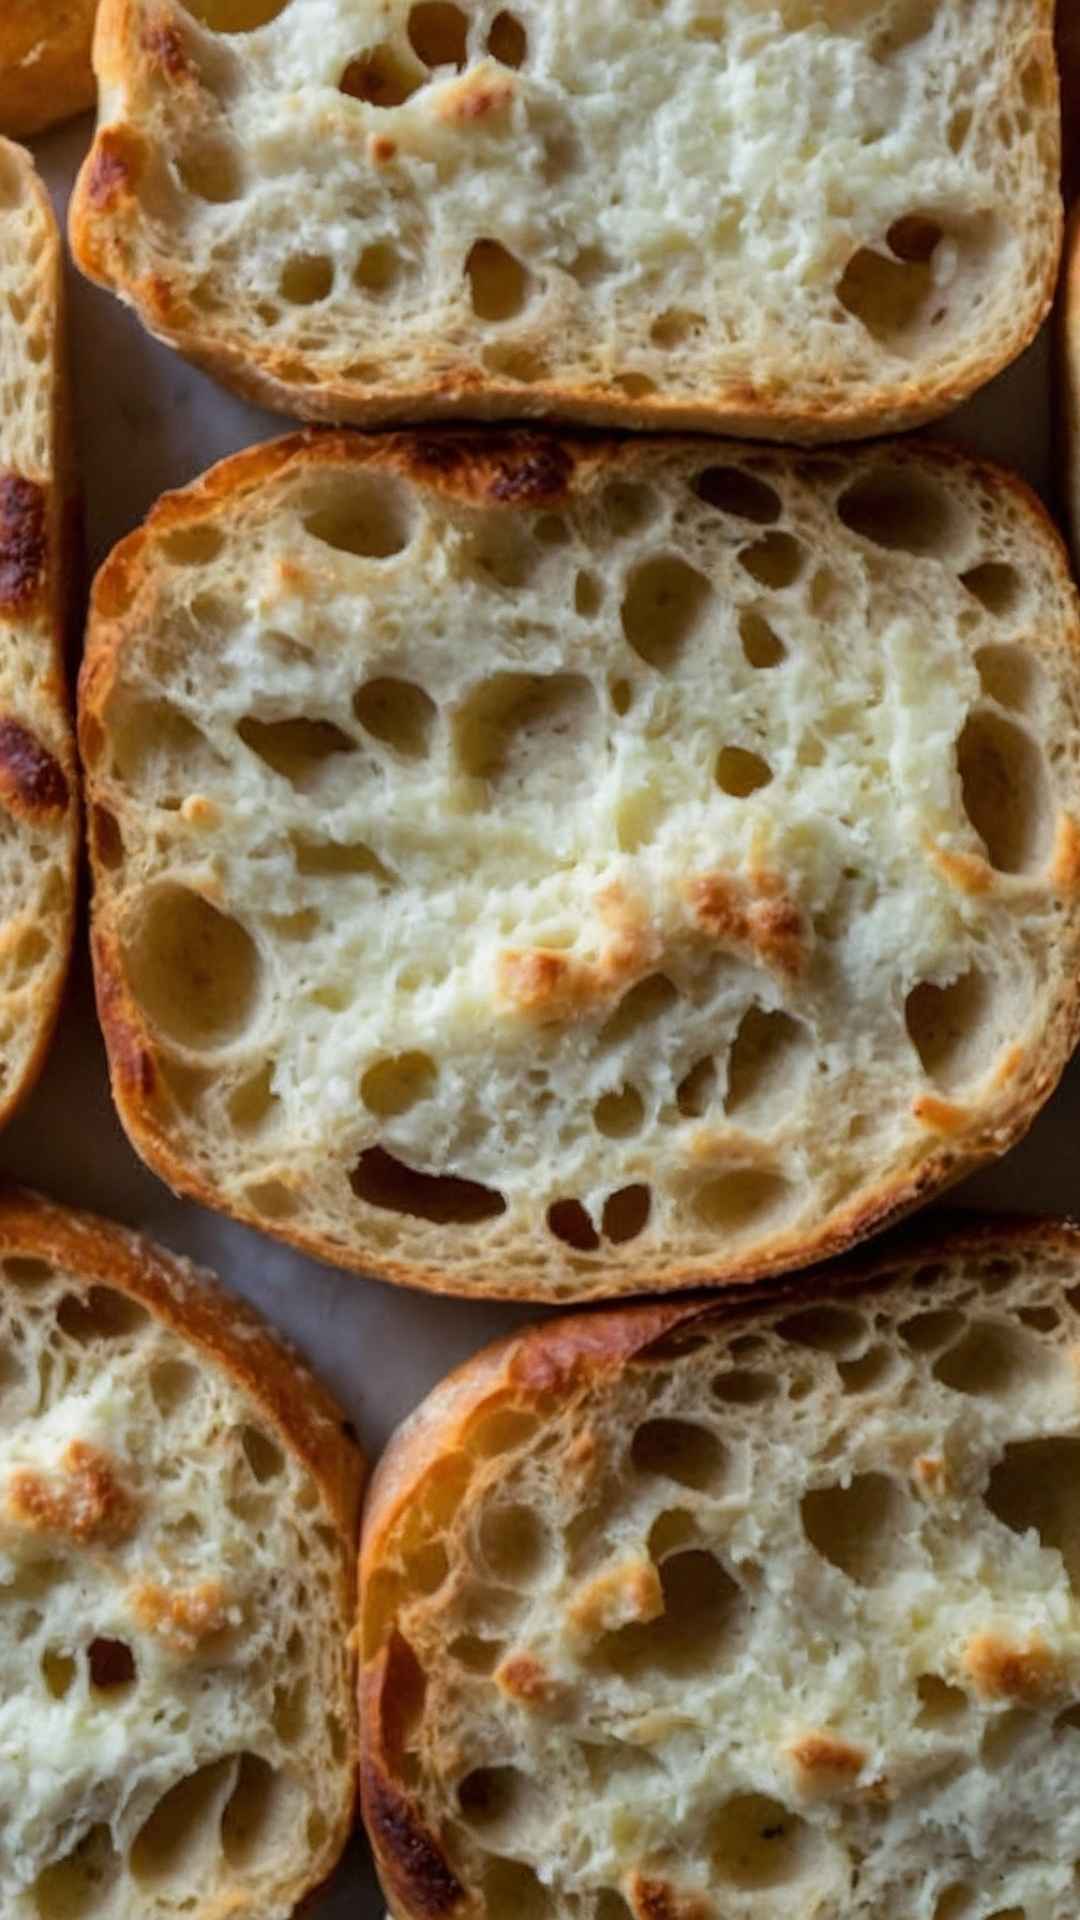
While the dough is proofing, it’s time to preheat your oven to 450°F (232°C). Place a baking stone or an inverted baking sheet inside as it heats. This will give your ciabatta that perfect crust.
Step 7: Bake the Bread
Once the oven is hot and your dough has puffed up, it’s time to bake! Carefully transfer the ciabatta onto the hot baking stone. If they stick, you can use the parchment paper to help slide them off.
Baking will take around 20-25 minutes, but keep an eye on them. You’re looking for that golden-brown crust and a hollow sound when you tap the bottom.
Let the loaves cool on a wire rack before slicing. Patience, my friend; good bread takes time.
Recipe Notes
High-Gluten Bread Flour
This flour is crucial for texture. It contains more protein than all-purpose flour, resulting in the chewy crumb we associate with artisan bread.
Active Sourdough Culture
Using a lively starter is key. Make sure it’s well-fed and bubbly before using it in your recipe.
Lukewarm Water
Water that’s too hot can kill the yeast, while cold water won’t activate it. Lukewarm is the sweet spot!
Sea Salt
Not only does it enhance flavor, but it slows down the fermentation slightly, allowing for more complex flavors to develop as your dough rises.
Olive Oil
This adds moisture and tenderness to the bread. It also helps with the crust’s color.
Honey
The sweet element not only adds flavor but also helps to caramelize the crust.
Recipe Variations
Want to switch things up? Here are a few ideas to take your sourdough ciabatta to the next level:
- Herbed Ciabatta: Mix in chopped fresh rosemary or thyme for a fragrant twist.
- Olive and Feta: Fold in pitted olives and feta cheese for a Mediterranean flair.
- Garlic Bread Ciabatta: Mince a few cloves of garlic and mix it into the dough before baking for an aromatic treat.
- Whole Wheat Variation: Substitute half of the bread flour with whole wheat flour for a nuttier flavor.
Nutrition Facts
simple sourdough ciabatta bread nutrition facts


Simple Sourdough Ciabatta Bread
Ingredients
Equipment
Method
- In a large mixing bowl, combine the active sourdough culture and lukewarm water. Stir until the culture is fully dissolved in the water. Next, add the honey and olive oil. This mixture should feel warm and welcoming between your fingers.
- Now, sprinkle the high-gluten bread flour over the liquid mixture. Use a wooden spoon or your hands to gently mix everything until no dry flour remains.
- You should feel a sticky and somewhat shaggy dough forming. Don’t worry if it feels like a mess; this is perfectly normal.
- Cover the bowl with a clean kitchen towel and let it rest for about 30 minutes. This is called the autolyse phase.
- During this time, the flour absorbs the water, and enzymes start breaking down the starches. For me, this waiting time is a moment to reflect — yes, I really did that mix!
- Now, sprinkle the sea salt over the dough. With wet hands, fold the dough over itself a few times to incorporate the salt. It’s a bit like giving your dough a gentle massage – never fret about getting a little sticky!
- After the salt is mixed in, you’ll want to knead. I prefer to knead right in the bowl. Grab a section of dough, stretch it upward, and fold it over itself. Repeat this for about 6-8 minutes, or until the dough becomes smooth and elastic.
- Transfer the kneaded dough to a lightly oiled bowl. Cover it with plastic wrap or a damp kitchen towel and set it aside in a warm place for about 4 to 6 hours.
- This is the bulk fermentation stage. During this time, the dough will rise and develop flavor.
- Every hour, I give it a gentle stretch and fold — this helps to build the gluten structure. I find it so satisfying to watch it transform. The dough will swell like a happy balloon!
- After your dough has risen significantly, pour it onto a well-floured work surface. This part is critical: be gentle! Use a bench scraper to divide the dough into two equal pieces.
- Gently shape each piece into a rectangular shape without deflating too much air. Flour your hands so the dough doesn’t stick to you like glue. Transfer the shaped pieces onto a well-floured baking sheet. Let them rest for 30 to 45 minutes.
- While the dough is proofing, it’s time to preheat your oven to 450°F (232°C). Place a baking stone or an inverted baking sheet inside as it heats. This will give your ciabatta that perfect crust.
- Once the oven is hot and your dough has puffed up, it’s time to bake! Carefully transfer the ciabatta onto the hot baking stone. If they stick, you can use the parchment paper to help slide them off.
- Baking will take around 20-25 minutes, but keep an eye on them. You’re looking for that golden-brown crust and a hollow sound when you tap the bottom.
- Let the loaves cool on a wire rack before slicing. Patience, my friend; good bread takes time.
Nutrition
Video
Notes
High-Gluten Bread Flour
This flour is crucial for texture. It contains more protein than all-purpose flour, resulting in the chewy crumb we associate with artisan bread.Active Sourdough Culture
Using a lively starter is key. Make sure it’s well-fed and bubbly before using it in your recipe.Lukewarm Water
Water that’s too hot can kill the yeast, while cold water won’t activate it. Lukewarm is the sweet spot!Sea Salt
Not only does it enhance flavor, but it slows down the fermentation slightly, allowing for more complex flavors to develop as your dough rises.Olive Oil
This adds moisture and tenderness to the bread. It also helps with the crust’s color.Honey
The sweet element not only adds flavor but also helps to caramelize the crust.Tried this recipe?
Let us know how it was!Frequently Asked Questions
Q1: Can I use all-purpose flour instead of high-gluten bread flour?
Absolutely! The texture will be slightly different, but your ciabatta will still be delicious. Just understand it may be softer.
Q2: What if my dough doesn’t rise?
A lack of rise could indicate that your sourdough culture isn’t active enough. Make sure it’s bubbly and fresh. Also, check the temperature of your rising area; it shouldn’t be too cold.
Q3: How do I store my ciabatta?
Store your cooled ciabatta in a paper bag at room temperature for a few days. If you want to keep it longer, slice and freeze the leftovers in a freezer bag.
Q4: Can I make this dough in advance?
Yes! After the first rise, store it in the fridge for up to 24 hours. The slower fermentation will add more flavor.
Q5: Why is my crust not crispy?
A crispy crust can be created by introducing steam into the oven. A pan of water at the bottom of the oven can help, or spritzing the dough with water right before baking can do the trick.
Q6: Can I make rolls instead of loaves?
Definitely! You can shape the dough into rolls after the first rising and bake them for about 15-20 minutes.
Conclusion
Making simple sourdough ciabatta bread is a gratifying adventure. With basic ingredients and a little time, you can produce a loaf that is not only beautiful but also full of flavor.
This bread brings people together, evokes the warmth of home, and turns any meal into a feast.
If you’re venturing into the world of bread-making, this sourdough ciabatta is the perfect project. I hope this recipe inspires you to grab your apron and dive into your kitchen. There’s magic in every loaf, waiting to be discovered and shared.
Enjoy making your ciabatta – may it be the highlight of your dining table for years to come!